


Last Updated 2022.03.08
How to intall and advanced AMP for WP

When you make WordPress an AMP-enabled website, you can support AMP with two main plug-ins. One is the AMP plug-in. Google is also involved in the development of this plug-in and is recognized as the official plug-in of the AMP project. At first, I installed this AMP plug-in, but it was difficult to understand how to set it up, so I was not know if it was possible to coexist with a normal website and an AMP-compatible site, so I used this AMP for WP plug-in. This AMP for WP plug-in is
https://Your Domain/Content/amp/
Below, all the content of your website will be built. This means that when you visit your website on a mobile device, you can access the AMP page by accessing the /amp/ following URL when you are on an AMP-enabled page, and by accessing the URL that removes /amp/ from the URL when accessing a normal mobile site. Depending on your settings, you can also automatically link to AMP-enabled and non-AMP mobile pages. I think this is a big advantage. I would like to explain the detailed setting of such a useful plug-in AMP for WP immediately.
AMP for WP Install
Amp for WP plug-in installation. Enter AMP for WP in the plug-in→ form from "New" in the "Plug-in" menu on the left side of the Management Screen. When you see the AMP for WP plugin, press the "Install" button to install the plug-in. When the installation is complete, press the "Enable" button to activate the plug-in. When the plug-in is enabled, an item called AMP is added to the left menu of the management screen, so click the AMP menu.
AMP for WP Advanced Settings – Settings
When the AMP for WP plug-in settings menu opens, click the Radio button in Advance Setup to switch to advanced settings in Advance Setup.
Then open the Settings screen.
AMP for WP Advanced Settings – General
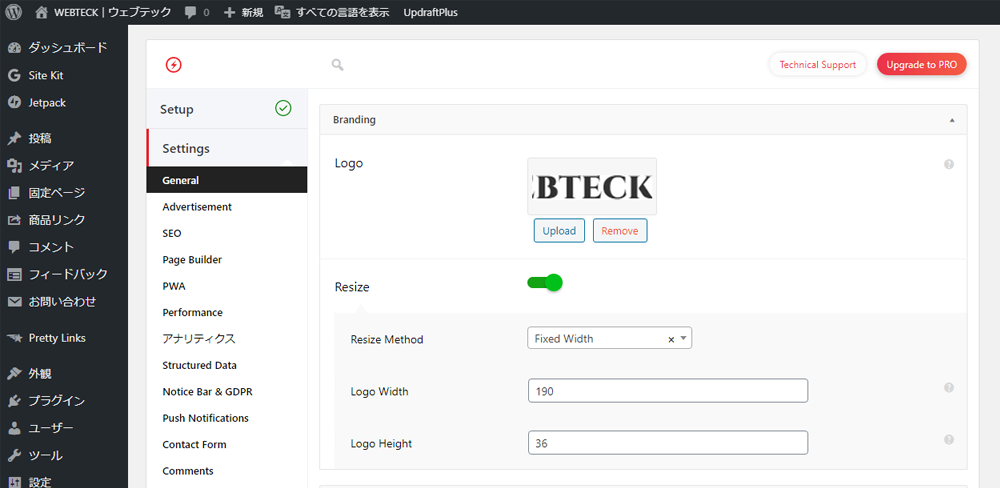
Upload your website logo. The logo is a logo image for pc sites. If you select "Fixed width" from "Resize", it will automatically resize to the appropriate image size.
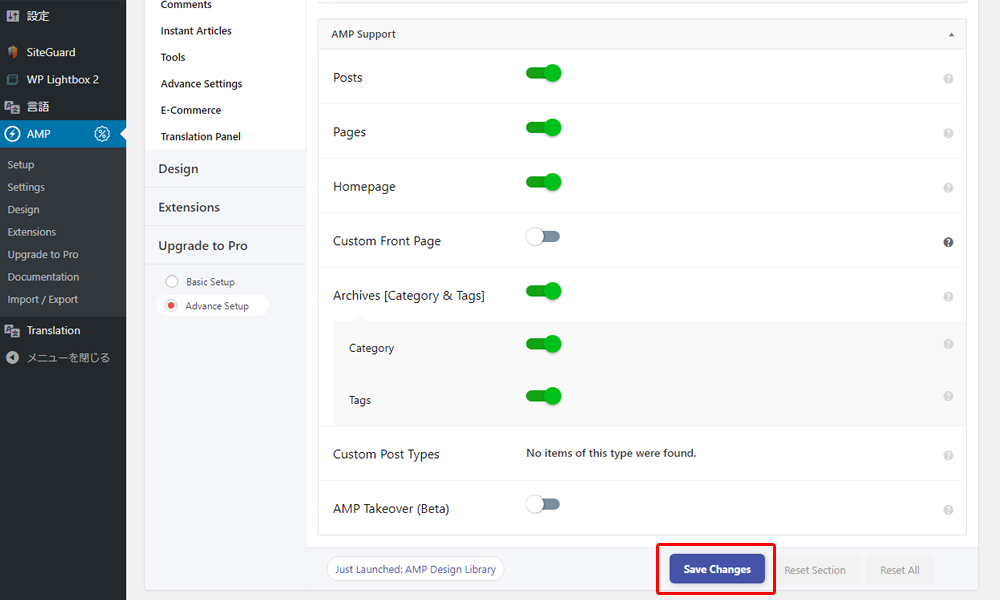
Select the type of content you want to amp on the WordPress website.
Posts
Pages
Homepage
Archives [Category & Tags]
Category
Tags
The above items are enabled for AMP on this site. The concept is that by attaching /amp/ to the URL of the entire website, an AMP-based page is displayed. The idea is that users who visit amp pages will be able to view the website while improving mobile usability by going around in amped content.
Finally, don't forget to save by pressing the Save Changes button.
Advanced AMP for WP Settings – Advertisement
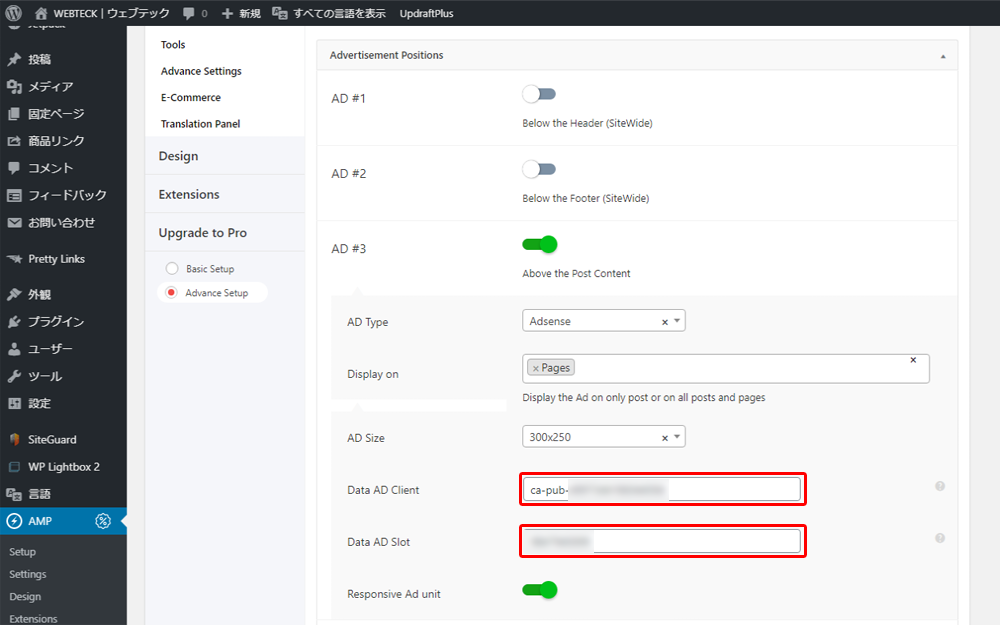
Next is the ad settings in the AMP page. There are two types of advertisements, but in Japan, it is only Google Adsense.
Select Adsense for AD Type. And then
Data AD Client
Data AD Slot
Fields will appear, so enter data for each. For Data AD Client and Data AD Slot, pull it out of the ad code when you created the Google Adsense ad unit. For details, please check the link below.

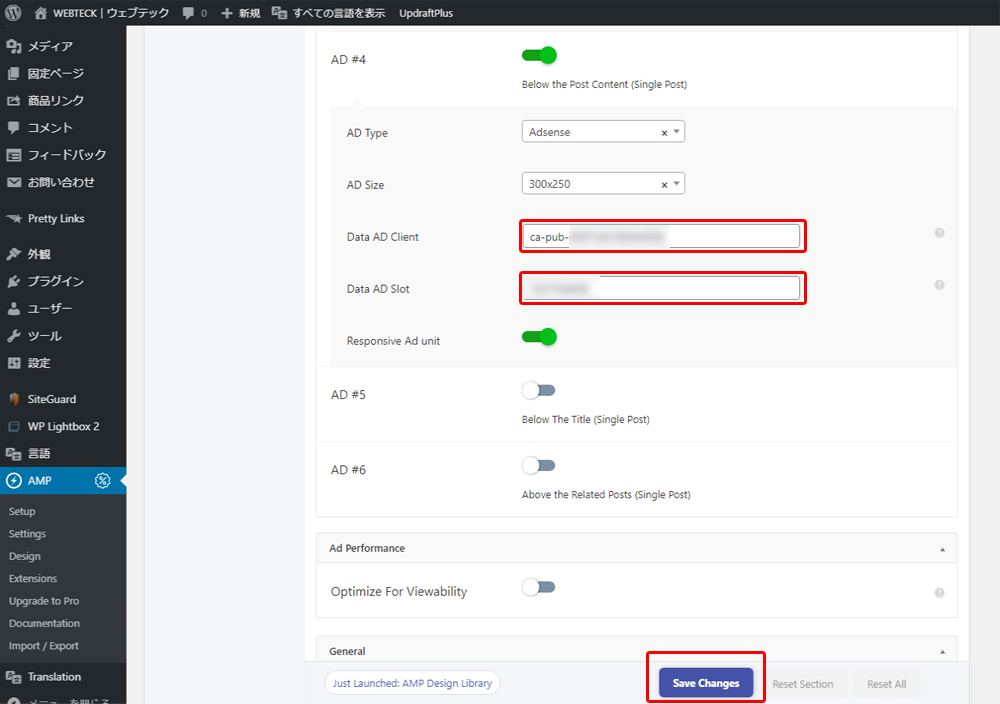
On this site, we only use Above the Post Content (at the top of the post page) andBelow the Post Content (below the post page).
Adsense ads can be placed elsewhere, but this site automatically inserts Adsense ads on Site Kit By Google, so we don't show ads elsewhere. If you have Site Kit by Google installed, it will automatically place adsense ads in AMP content.

In addition to installing the Site Kit by Google plug-in, you need to enter html code for adsense calls for AMP pages. Adsense auto-insert HTML code for AMP can be set from amp for WP settings described later after referring to the link below.

AMP for WP Advanced Settings – Analytics
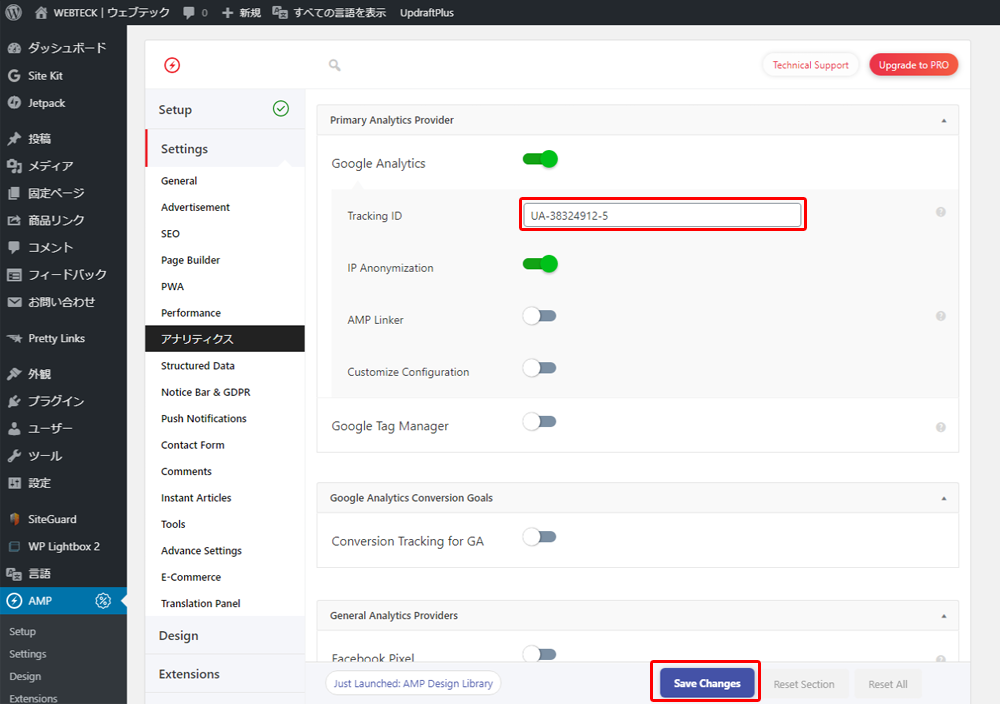
Analytics settings. Amp for WP allows you to set up various access analyses, but here we will explain the settings for Google Analytics. When Google Analytics is turned on, you can enter "Tracking ID", so enter the Analytics property set in Site Kit By Google. It will be a string starting with UA-. Currently, google analytics 4 is not supported for the latest analysis of Google Analytics. However, we think it will be rich to support Google Analytics 4 in future updates. This is because this AMP for WP plug-in has been developed by companies and has released a paid version, so it is likely that it will be the first to respond to the latest technology.
ADVANCED AMP for WP Settings – Notice Bar & GDPR
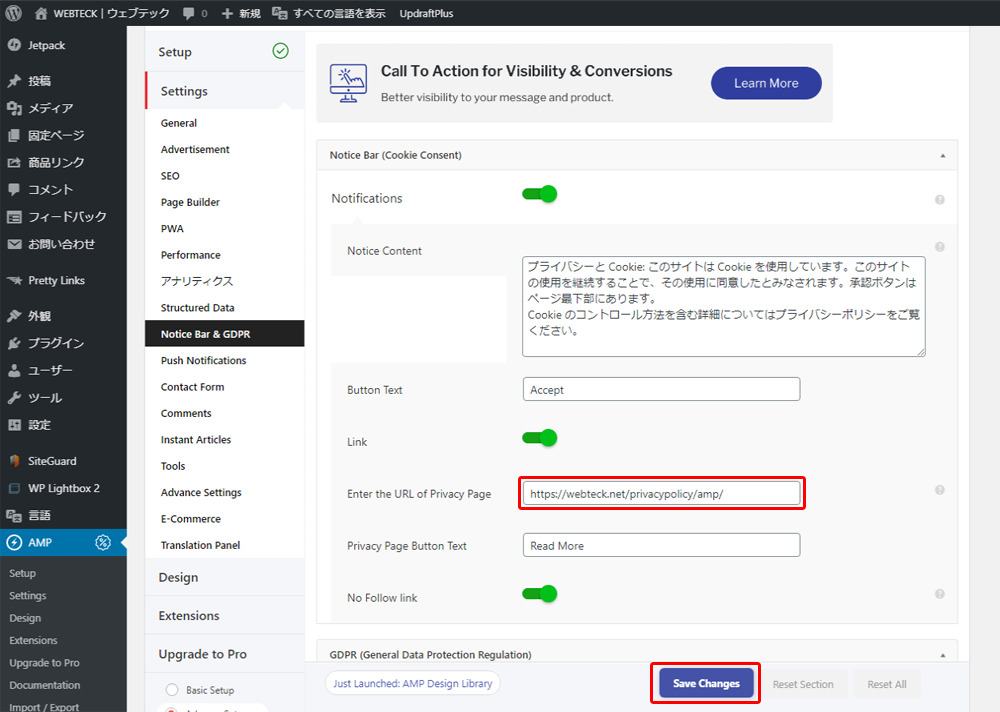
Whether or not cookies are displayed on the user-accepted approval screen and on the GDPR approval page for the EU. The cookie user approval screen works fine, but the Notice Bar and GDPR screens cannot be used at the same time. You will be choosing one or the other. There is no approach to EU users at this time, so we are not using the GDPR screen. If we start to develop english pages in the future, we will switch to the GDPR screen.
Advanced AMP for WP Settings – Advance Settings
Next is advance settings flying a little. This field is set to:
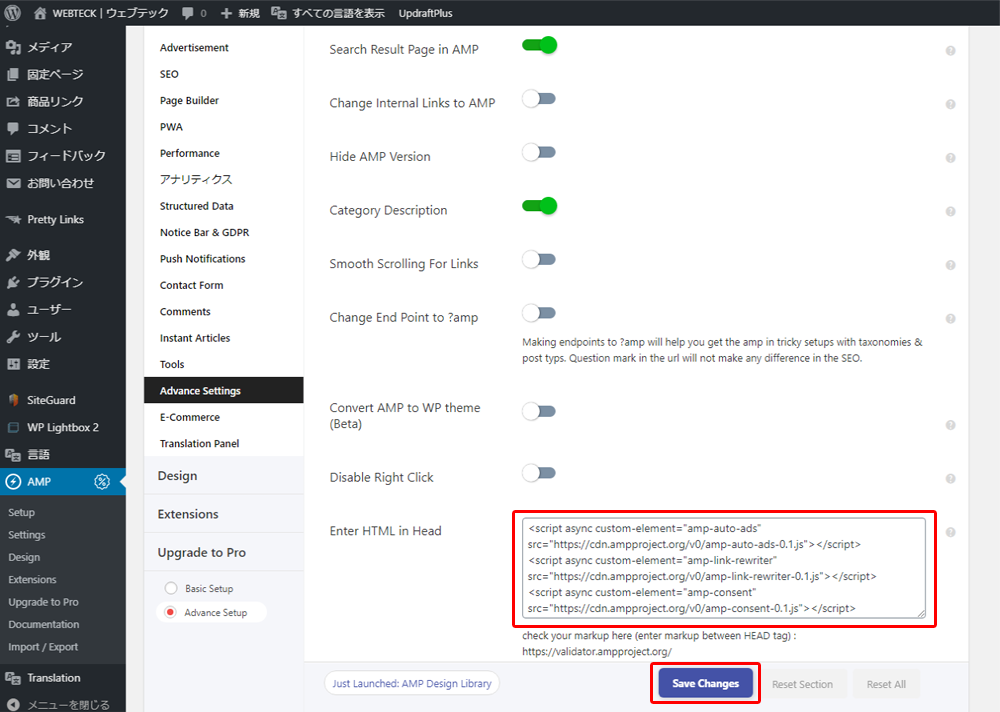
Search Result Page in AMP
Category Description
Enter HTML in Head
Enter HTML in Footer
Auto Add AMP in Menu URL
The points in Advance settings are enter HTML in Head and Enter HTML in Footer items. By entering the HTML code in this form, you can automatically advertise google adsense.
<script async custom-element="amp-auto-ads" src="https://cdn.ampproject.org/v0/amp-auto-ads-0.1.js"></script>
<script async custom-element="amp-consent" src="https://cdn.ampproject.org/v0/amp-consent-0.1.js"></script>
The first line is the code you need to use Google Adsense and enter it into enter HTML in Head.
The second line is the code you need when using the Notice Bar & GDPR's Notice Bar. This is also entered into enter HTML in Head.
In the Enter HTML in Footer form, type the following code:

The above code is set with the amp-auto-ads code entered in Enter HTML in Head.
<amp-auto-ads type="adsense" data-ad-client="ca-pub-1234567899876543"></amp-auto-ads>
This is what enter HTML in Head defines the amp-auto-ads tag and outputs it in the body tag in Enter HTML in Footer. This code is output only within the AMPed page and does not output when it transitions to a non-AMP page. The above code is an example, and ca-pub-1234567899876543is the Google Adsense ID of website. When you get Google Adsense, you will be granted such an ID. For more information on how to run automated ads on amp-turned-pages, see Google Help below.
The Auto Add AMP in Menu URL affects the menu settings. "Appearance→ Automatically add /amp/ to the URL so that all menus set in "Menu" link to AMP-enabled pages. Enabling this setting increases the chances of an increase in the rate of turnover in AMP content. Depending on the theme, the global header menu at the top of the page and the footer menu at the bottom of the page change to amp URLs, which improves usability and makes it mobile-friendly by linking amp content to AMP content.
Next time, I will explain how to set up advanced settings – Design for AMP for WP.