Last Updated 2021.02.05
Set DNS settings for onamae.com domain-core server integration

When trying to operate a website by acquiring a unique domain and renting a rental server, DNS settings may be one of the settings that beginners find difficult.
If you search by keywords such as DNS setting, CORESERVER, and name.com in Google search, you will find a website that explains how to set DNS to operate the domain acquired by name.com on the core server. The sites are all websites that explain incorrect DNS settings.
As a result, the IP address of the server is pulled from the domain, so the setting is correct, but should I set it in a smarter way? It is just a commentary.
In this article, after a brief explanation of DNS, we will explain how to set the DNS of the domain acquired by onamae.com.
If you remember this method, you will be able to smoothly migrate the DNS settings even if you later migrate the rental server to another company.
What is DNS?
First of all, what is DNS easily? I will explain about.
What is DNS? When searching for a website on the Internet, enter the URL (domain) in the address field of the browser to display the website. I want to display the website with this URL (domain), but the location of the web server Where is it? The mechanism to match the location (IP address) of the WEB server from the domain is called DNS.
Image of displaying a general DNS website
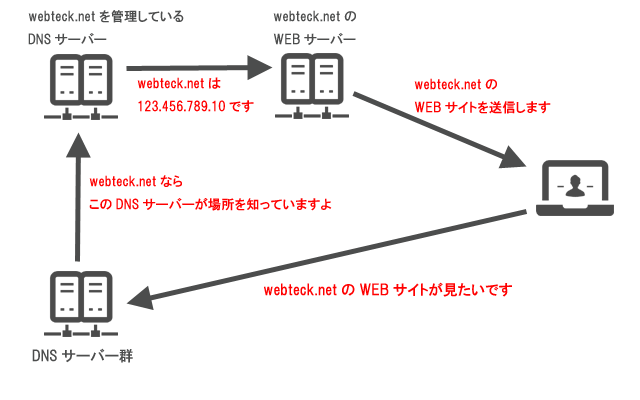
The figure above is an image from the URL (domain) inquiring about the domain to the DNS server, inquiring the location (IP address) of the WEB server, and the user displaying the WEB site.
- The user requests to display the website by entering the URL (domain) in the address field of the browser.
- In the DNS server, the DNS server that manages the sent URL (domain) finds out where and forwards the request.
- The DNS server that manages the URL (domain) forwards the request to the location (IP address) of the WEB server.
- The web server sends the page data of the website to the user in response to the transferred request.
- The user can see the website page displayed on the browser
Correct DNS settings for onamae.com and core server
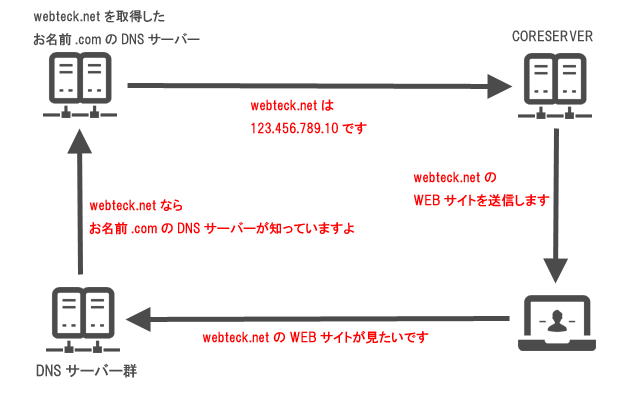
If you practice the DNS setting method explained in this article, you will make an inquiry from the URL (domain) on the Internet with the DNS server, the request will be forwarded to the WEB server, and the WEB site page will be displayed to the user from the WEB server. Is as shown above.
There is often an explanation that DNS is set on the Value Domain management screen, but it is not necessary to do so. All domain settings are completed on the management screen of onamae.com site.
Settings are easy, and the flow of users displaying websites on the Internet is smooth.
If you remember the DNS setting method explained below, even if you move the server, you can change all the DNS settings on the name.com side, so the server migration can be done smoothly.
DNS settings for operating the domain acquired by name.com on the core server
This section describes the DNS settings for operating the domain acquired by onamae.com on the core server.
Get the server’s IP address on the core server
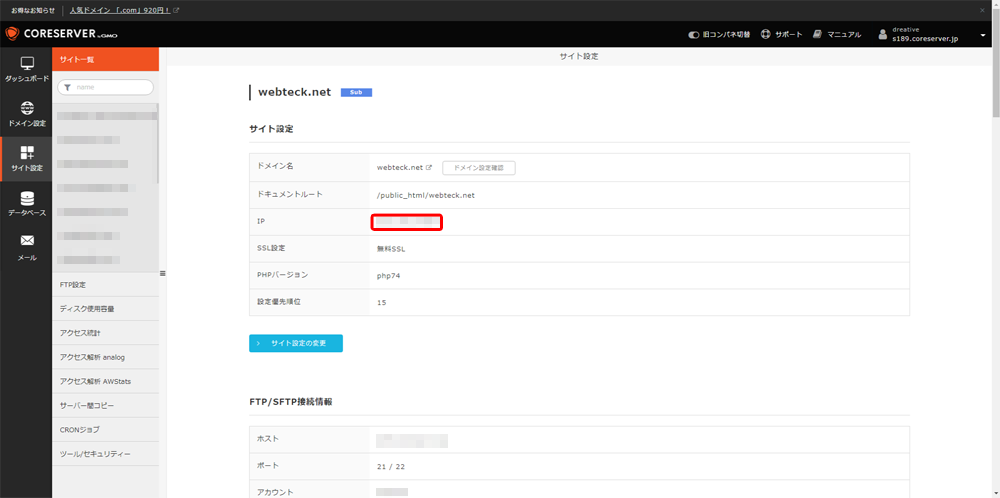
From the management screen of the core server, select the domain of your website in “Site settings” and move it. When the setting screen as shown above appears, make a note of the “IP” item. This IP address will be the IP address of the server. You can check the IP addresses of other rental servers from the same screen. For details, see the FAQ of your rental server.
Set up DNS on onamae.com

Learn how to log in to onamae.com domain NAVI and set up DNS.
First, log in to onamae.com domain NAVI.
After logging in, click “DNS”-> “Domain DNS settings” from the header menu at the top of the screen.
Select the domain for which you want to set DNS
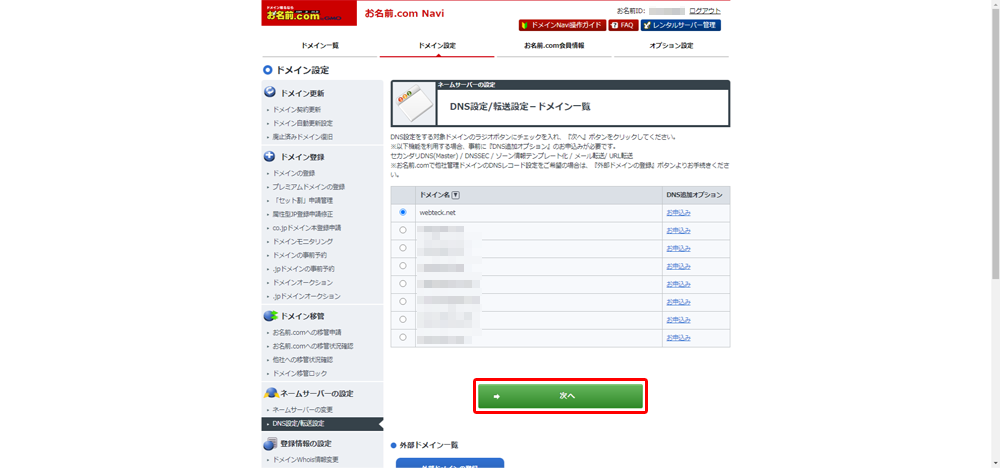
After transitioning to the list screen of domains for which DNS can be set (above), press the radio button for the domain for which DNS can be set, check it, and click the “Next” button.
Use DNS record settings
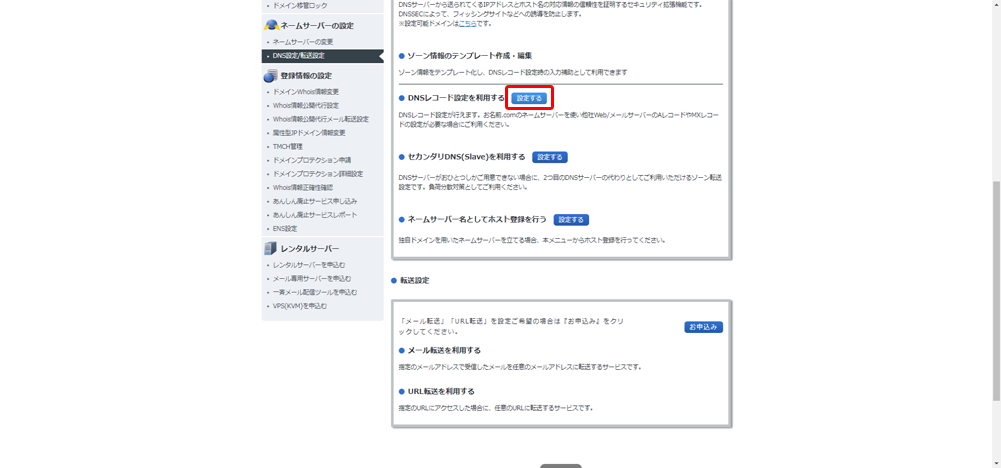
Find the item that uses the DNS record settings. When you find an item that uses DNS record settings, click the “Set” button.
DNS record settings-A record
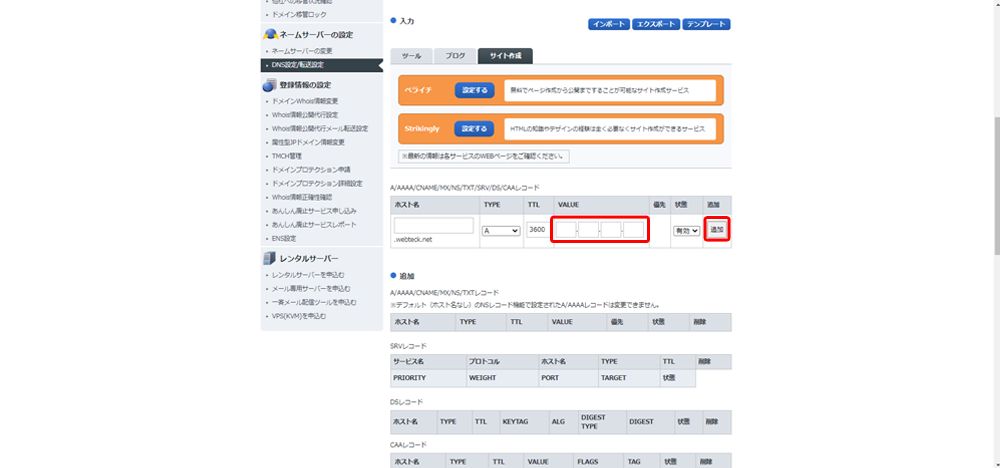
Here you can add / edit DNS record information.
Hostname: Blank
TYPE: A
VALUE: Enter the IP address of the server
If the above items are correct, click the “Add” button to add an A record.
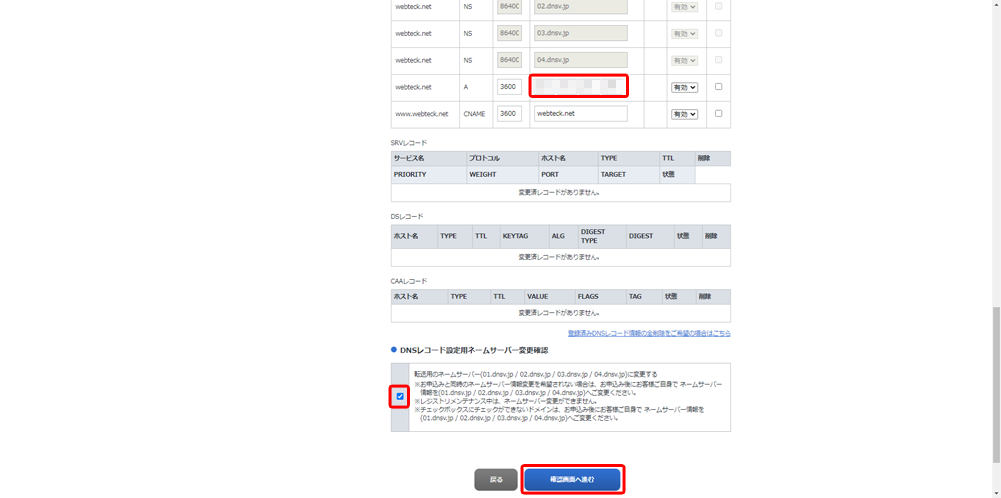
Make sure that the A record for the domain you want to set is added correctly.
Check the name server change confirmation for DNS record setting.
Make sure that the domain name, TYPE, and server IP address are entered correctly. If you like, click the “Proceed to confirmation screen” button.
Check the current DNS record setting status. If there is no problem, click the “Set” button at the bottom of the screen and wait for processing. The DNS setting process takes tens of seconds to a minute. When the DNS settings are complete, a completion notification email will be sent to the domain owner.
That’s all for setting DNS when acquiring a domain with onamae.com and operating it on the core server.
By registering the IP address of the core server in the A record of the DNS server of onamae.com, the website operated by the core server will be published on the Internet with your own domain.
If you remember this method, when you migrate the rental server, make a note of the IP address of the rental server of the migration destination, and change the IP address of the A record in “Domain DNS settings” of onamae.com to the IP of the new rental server. You can easily migrate the server just by changing the address.
You can set the record for the subdomain called CNAME in the same way from “Domain DNS settings” above.
That’s all for setting the domain DNS of onamae.com.
Please remember the setting method and use it.


